

Overview & When to Use
What this feature does
Customer Management provides location-scoped customer views and management capabilities. You can view customers for a specific store location or filter to see all customers across multiple locations. The system includes modal windows for creating new customers and editing existing customer information, plus improved search functionality with publisher and product type filters.
When to use it
When managing customers across multiple store locations
When using improved search filters to find specific comic titles
Prerequisites
Product catalog imported for searching additional items
Store location assigned to your user account
Key terms
All Locations – Filter option to view customers across all store locations
Publisher Filter – Search filter to narrow results by specific publishers
A Covers Only – Filter to show only items where Issue Sequence Number = 0
How to Use Customer Management
Step-by-step
Go to Customers → All Customers to view your customer list.
Select your specific store location from the location dropdown to see only customers for that location.
Use the All Locations filter to view customers across all store locations if needed.
To create a new customer, click Create New Customer to open the modal window.
Fill in the customer details form with name, email, phone, and assign them to a specific location.
Click Save to create the customer account.
To edit an existing customer, click the Edit Customer link on their customer screen.
Update any information in the edit customer modal window.
To add additional items to a customer's subscription, use the improved search with filters.
Use the All Publishers dropdown to search within specific publishers.
Select Product Type to narrow results by comic type.
Check A Covers Only to show only items where Issue Sequence Number = 0.
Toggle Include Past FOC to include older series in search results.
Click Save to confirm all changes.
What you should see
Customer list filtered by your selected store location
Clear indicator showing which location is currently selected
New customer appears in the customer list assigned to the selected location
Edit customer modal window opens when clicking Edit Customer
Improved search results with filtered options for publishers and product types
Customer exports include only customers from the selected location (unless "All Locations" is selected)
Screenshots:
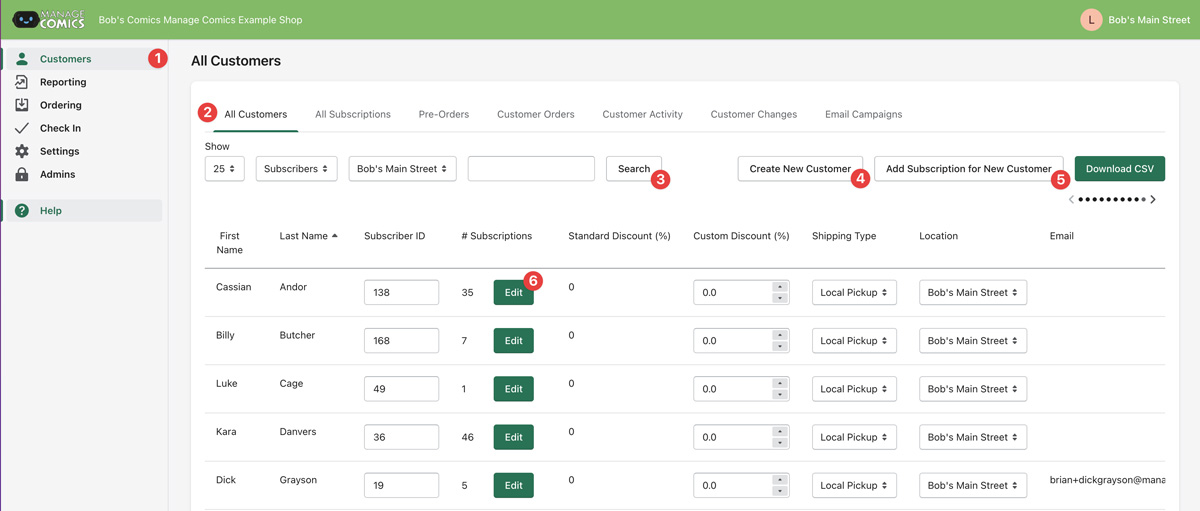
1 - Customers main navigation
2 - All Customers
3 - Search for customers by type (new, subscribers, non subscribers, disabled), location, name
4 - Create a new customer, opens up a create new customer modal window
5 - Add subscription for new customer, opens up add subscription modal window
6 - Edit existing Customer, allows you to edit the subscriptions of an existing customer
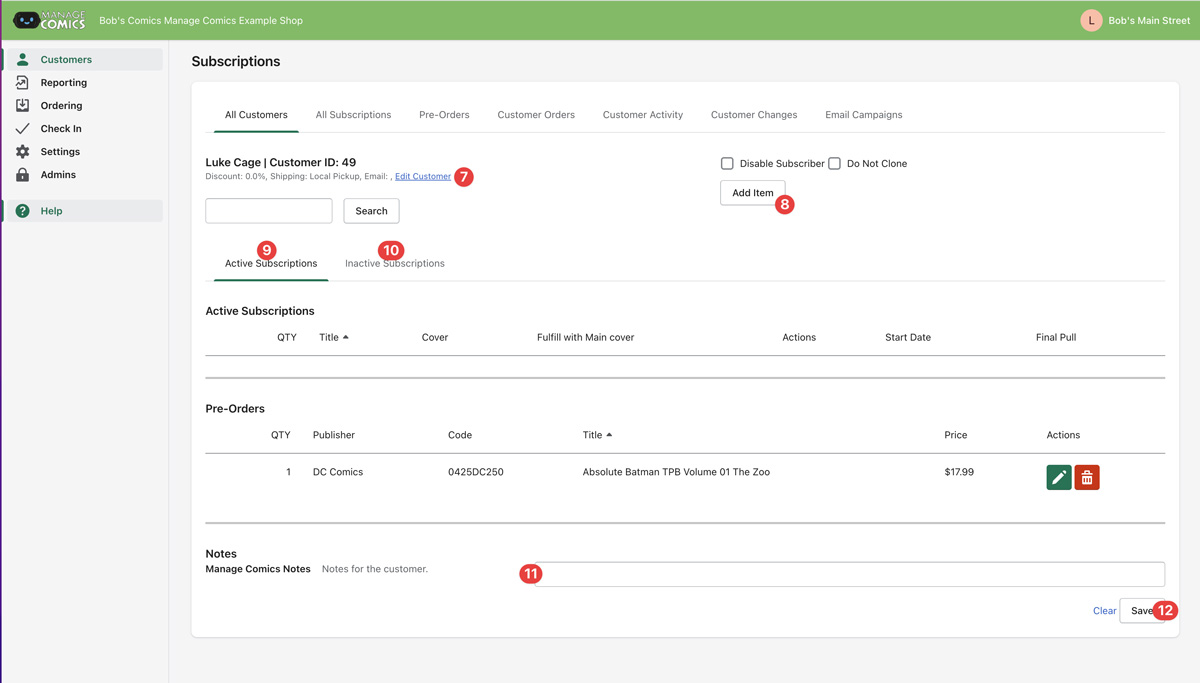
7 - Edit Customer, opens modal window to edit customer information
8 - Add Item, opens the modal window to add items to a customer
9 - Active Subscriptions, list of subscriptions that are currently in the "Active" state (have 1 or more items coming out in the next 3 months, or have had an item that came out in the previous 30 days).
10 - Inactive Subscriptions, list of subscriptions that were either cancelled by the subscriber/admin, or which are in the "Inactive" state (no issues coming out in the next 90 days, no issues have come out in the previous 30 days).
Add Subscriptions Modal Window
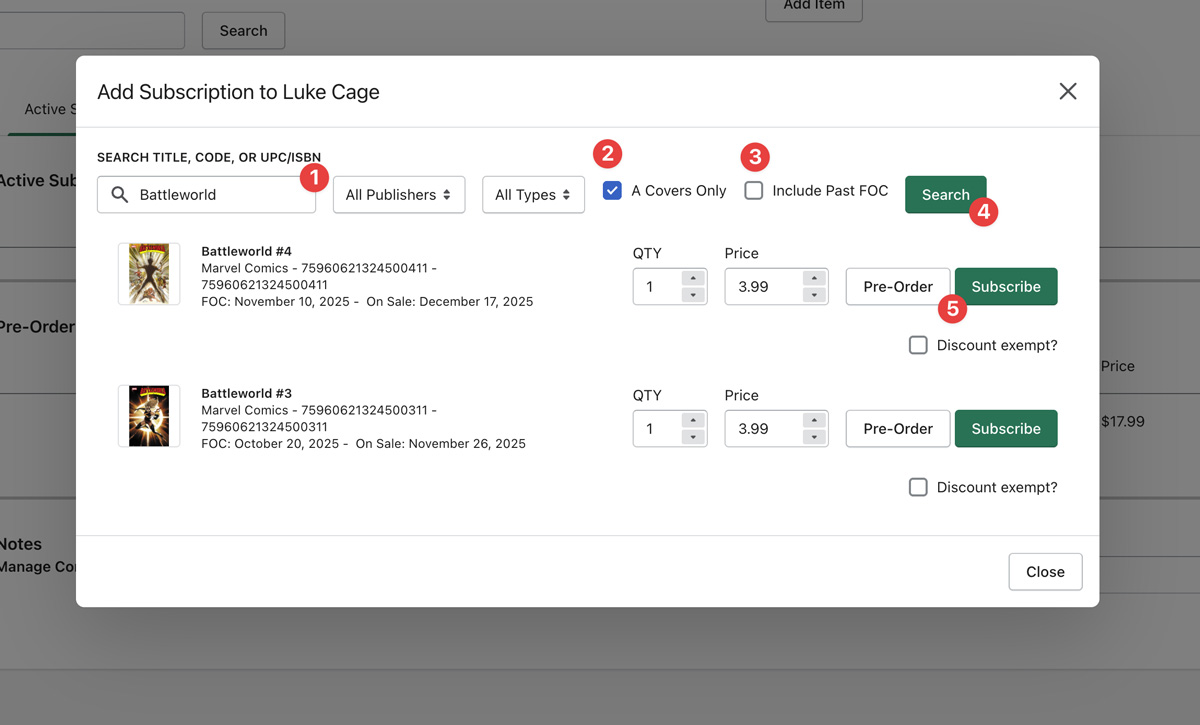
1 - Search box - Search for a title, a code, or a UPC/ISBN
2 - A Covers Only - Filter by only A Covers
3 - Include Past FOC - Include items who's FOC date is earlier than today
4 - Search button
5 - Pre-Order or Subscribe to the item
Tips
Use the improved search filters to narrow down broad searches like "Batman" or "Spider-Man"
Check "A Covers Only" when customers want regular covers instead of variants
Search results are automatically scoped to your selected location unless you choose "All Locations"
Troubleshooting
Can't find a customer in the list – Check the location filter and ensure you're viewing the correct store location
Create New Customer button not working – Ensure you have proper permissions and try refreshing the page
Search results too broad (e.g., "Batman" shows too many items) – Use the Publisher filter and Product Type filters to narrow results
Can't find specific comic titles – Try using "A Covers Only" filter and check "Include Past FOC" for older series
Customer exports missing information – Verify you're exporting from the correct location filter and check that all required columns are selected
Edit Customer modal not opening – Ensure you clicked the "Edit Customer" link on the customer's individual page