Overview & When to Use
What this feature does
The RMH Import Utility Wizard provides a guided interface for importing and updating product data in bulk. You can import new items, update existing item properties, or add item aliases using structured data files. The wizard includes mapping capabilities to match your data columns with the appropriate database fields.
When to use it
When importing your weekly new releases, FOC files, or Initial Orders with new products from distributor catalogs
When updating product information across multiple items at once
When adding item aliases for better product search and identification
When migrating product data from other systems
When performing bulk updates to pricing, descriptions, or other item properties
Prerequisites
RMH Store Manager must be installed and running
Import file must be in CSV, XLS, or XLSX format
Required codes (Supplier, Department, Category, etc.) must already exist in the database
Import file should not contain merged cells
Key terms
Import Utility Wizard – The guided interface for bulk data import operations
Mapping Template – Saved configuration file for column-to-field mappings
Item Lookup Code – Unique identifier for items that cannot be changed via import
Update Existing Record – Option to modify existing items during import
Item Alias – Alternative names or identifiers for products
How to Use RMH Import Utility Wizard
Step-by-step
Open RMH Store Manager and navigate to Tools → Import Utility.
Click Browse to select your import file (CSV, XLS, or XLSX format).
If importing an Excel file with multiple sheets, click Sheet Name and select the appropriate worksheet.
Optionally, select a mapping template file from a previous import to save time on field mapping.
For Data Type, select either:
Item – For importing items or updating existing item properties
Alias – For importing item aliases
Select Update existing record if you want to modify existing items or add new items.
Click Next to proceed to the mapping screen.
In the Map Fields section, manually map each column from your import file to the corresponding database field.
Optionally, click Save Mapping to create a template for future imports.
Click Next to review the mappings.
Review the import preview and fix any duplicate items (highlighted in red) before proceeding.
Click Import to begin the import process.
Click OK to confirm the import completion.
What you should see
Import Utility Wizard interface with file selection options
Field mapping interface showing your import file columns and database fields
Import preview with duplicate items highlighted in red
Import completion log showing successful imports and any errors
Log files saved to C:\ProgramData\RetailHero\RMH Store Import Utility
Screenshots and Step by Step
To import items or aliases using the Import Utility Wizard:
1. Click Tools.
2. Click Import Utility.
3. Select the import file containing the items you want to add or the item properties you want to update.
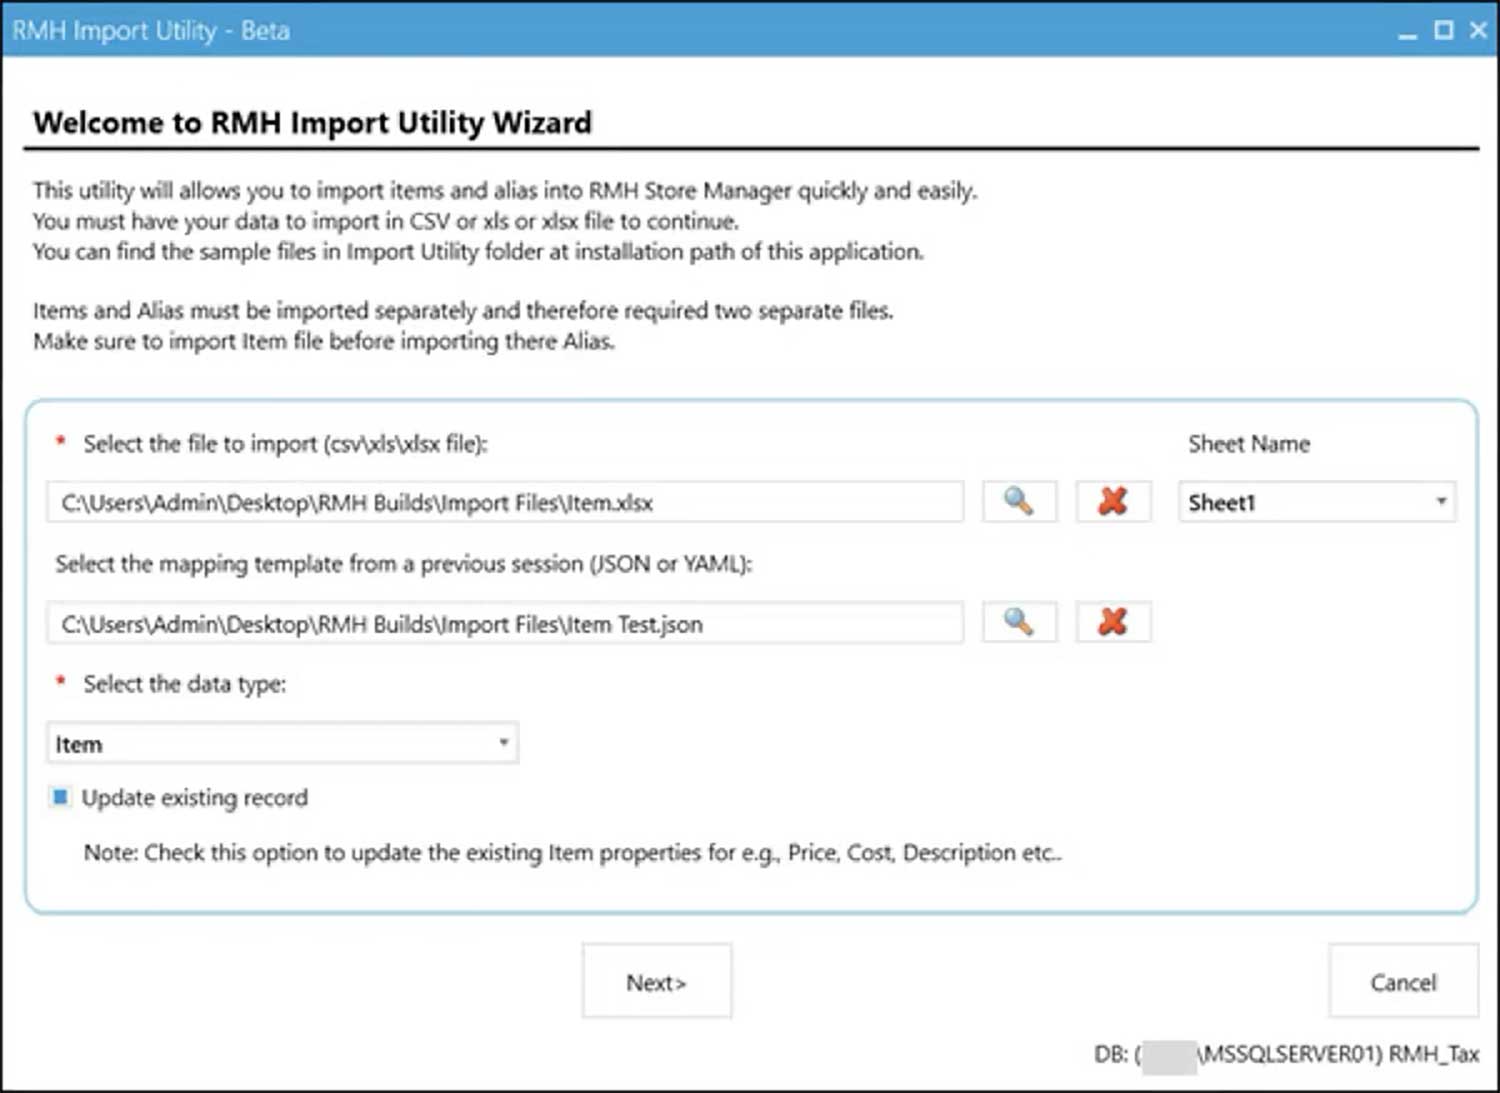
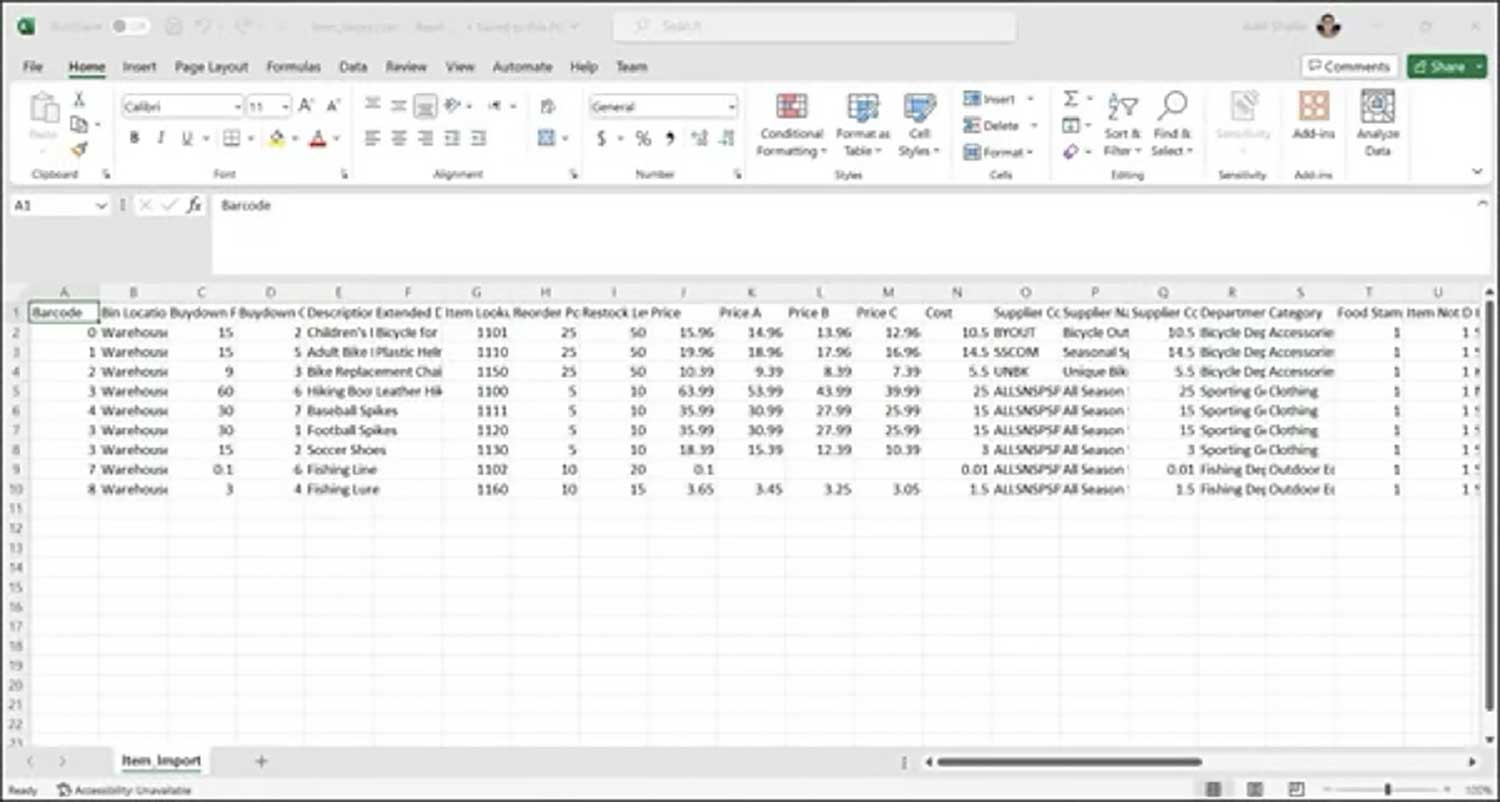
Note: Sample import files are available under C:\Program Files (x86) \Retail Hero\RMH Store Manager\Import Utility. There are six import files to choose from (Item Import.xlsx, Item Import.xls, Item Import.csv, Alias Import.xlsx, Alias Import.xls, Alias Import.csv). Use the sample import files to create your own import files. Refer to Item Import.txt and Alias Import.txt for a list of supported columns.
Refer to Mapping rules for the import utility for more information about mapping requirements. Do not merge cells in the import file.
Add Image of (RMH Import Utility Wizard interface showing file selection and mapping options)
4. Optionally, if you are importing an Excel file that contains multiple sheets, click Sheet Name and select the worksheet containing the items you want to add or item properties you want to update.
Note: If you do not select a specific worksheet, the Import Utility Wizard will use the first worksheet in the spreadsheet by default.
5. Optionally, select a mapping template file from a previous import.
You have the option to save the column/item property mappings to a template file. This can save you time in future imports. The mapping template file can be saved in either JSON or YAML format.
Note: You will need to enter the mappings manually the first time, and then click Save Mapping to create the mapping template file to use with future imports.
6. For the data type, select one of the following:
Item: Select if you are importing items or updating existing item properties (excluding the Item Lookup Code).
Alias: Select if you are importing item aliases.
7. Select Update existing record if you want to import new items, or update properties for items that already exist in the database.
Note: If Update existing record is not selected, only new items will be imported. Properties will not be updated for existing items.
8. Click Next.
9. If you did not select a mapping template file, manually enter the mappings between the columns in the import file and the fields in the database:
a. In the Map Fields row, in the relevant column(s), select the item property mapping.
Note: The File Fields row shows the column headings from the import file. The Map Fields row is where you map the column(s) to item properties. Refer to Item Import.txt and Alias Import.txt, available under C:\Program Files (x86)\Retail Hero\RMH Store Manager\Import Utility, for a list of supported columns. Refer to Mapping rules for the import utility for more information about mapping requirements.

Optionally, once you have selected the relevant mapping(s), click Save Mapping to save the column/item
property mapping(s) to a mapping template file for future imports.
10. Click Next.
Review the mappings, if the import file contains duplicate items or aliases they are highlighted in red. If necessary remove or fix the duplicates before starting the import
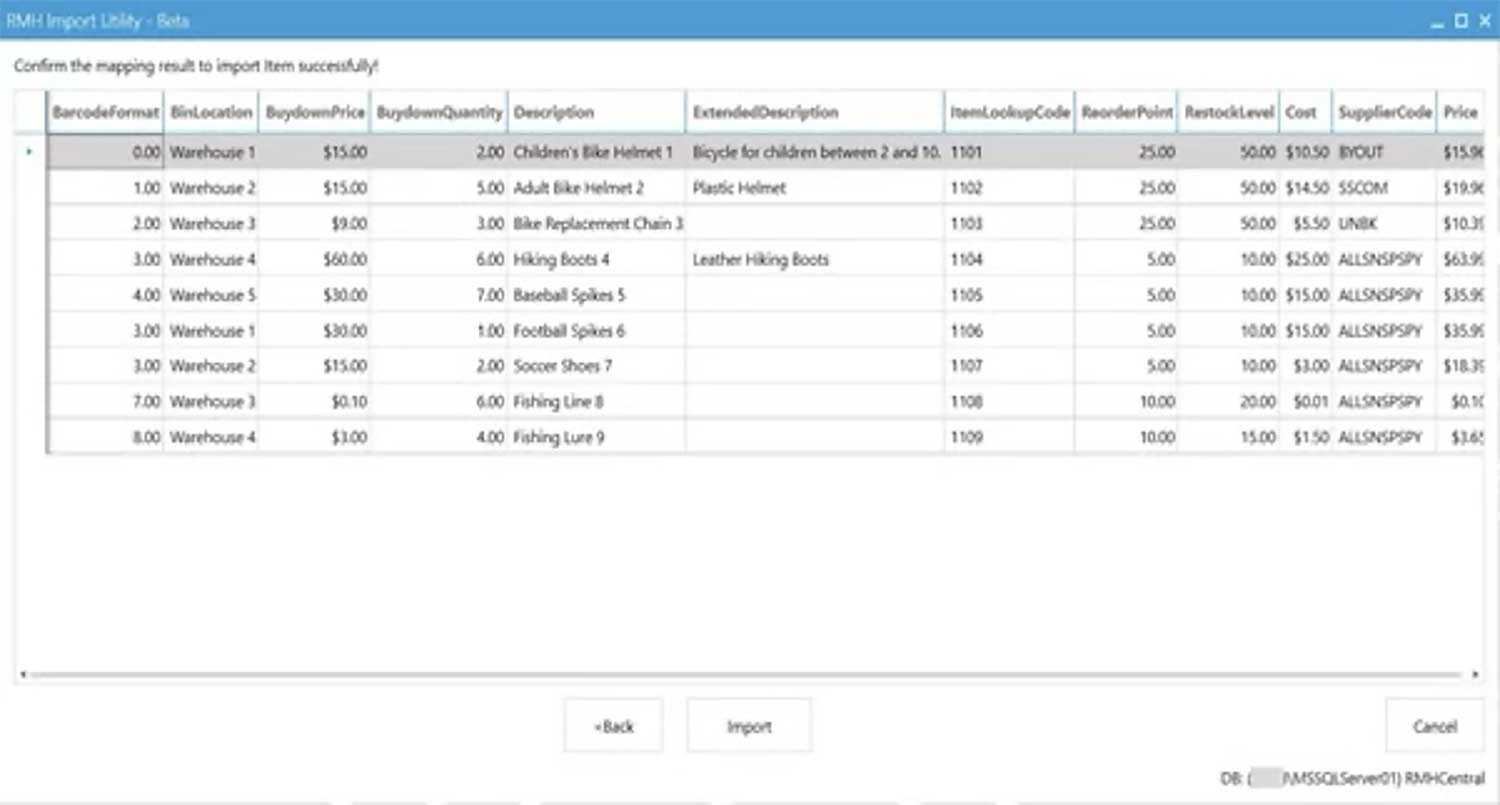
11. Click Import
12. Click OK
Note: After the import is complete a log file displays so you can check the import for issues. You can find this log file, and previous log files, under C:\ProgramData\RetailHero\RMH Store Import Utility. If there were issues with the import, correct the issues with the applicable records and run the Import Utility Wizard again to complete the import.
Tips
Use the sample import files located at C:\Program Files (x86)\Retail Hero\RMH Store Manager\Import Utility as templates
Save mapping templates for frequently used import formats to speed up future imports
Always review the import preview to catch duplicates before importing
Check the import log files after completion to identify any issues
Ensure all required codes (Supplier, Department, Category) exist in the database before importing
Do not merge cells in your import files as this can cause import errors
Troubleshooting
Import file not recognized – Ensure file is in CSV, XLS, or XLSX format and not corrupted
Mapping errors – Check that column headers match expected format and refer to Item Import.txt for supported columns
Duplicate items highlighted in red – Remove or fix duplicates in your import file before proceeding
Import fails with code errors – Verify that Supplier, Department, Category, and other required codes exist in the database
Cannot change Item Lookup Code – Item Lookup Codes cannot be modified via import; update manually if needed
Import log shows errors – Review the log file and correct issues in your import file, then re-run the import
Merged cells causing issues – Unmerge all cells in your import file before importing
Mapping template not loading – Ensure template file is in JSON or YAML format and not corrupted